Quick Start p2

Quick Start page 2
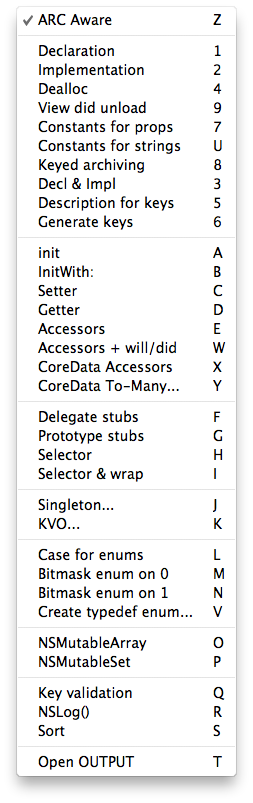
2. Generate additional code using the Action Menu
Tap the play button to watch 7 second demo
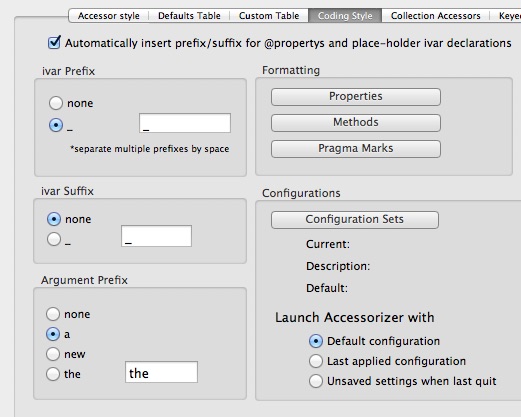
Note that the @synthesize statements define backing variables prefixed with the underscore. This is because in the initial Setup guide, I had you set your prefix to underscore. I also had you turn ON automatic insertion of prefix/suffix for ivar or property declarations. This is why the prefix was automatically inserted. If the automatic option is turned off, then when you declare your ivars, you have to manually enter the prefix or suffix if you want to use them. The automatic options saves you from having to type the actual prefix or suffix. NOTE: if you do have the option ON and if you do type the prefix or suffix manually, don’t worry, Accessorizer will ignore the prefix and not add it twice. Of course, if you prefer to not use a prefix or suffix, just choose the radio buttons titled “none”.


Assuming you have done the required initial setup shown in the Setup help page, and you have gone through the first page of the Quick Start guide, you will be able to show the Action Menu under your mouse location.
Important: As described in the Setup and Quick Start pages, in order to provide services to your code, you first must select your code, then send that code to Accessorizer by invoking the Accessorizer Action Panel Service via
SHIFT-OPT-CMD-0
(shift option command zero)
Assuming you have already generated @property statements as described on the first page of this Quick Start tutorial, there’s no need to reselect the code since Accessorizer already knows about your ivars or properties. Now we can generate our @synthesize statements and other related code.
-
1)Minimize Accessorizer to the Dock to get it out of our way if you haven’t already done so.
-
2)Move to your @implementation file and place your cursor’s insertion point where you would like your @synthesize statements to go.
-
3)Show the Action Menu via its shortcut:
SHIFT-CTRL-CMD-0
(shift control command zero)
-
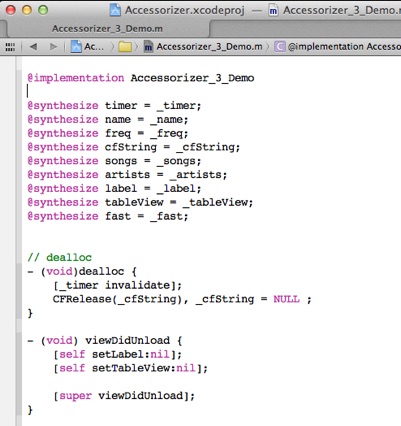
4)Press the “2” on your keyboard or select “Implementation from the second menu item in the list. Your @synthesize statements should be generated and inserted at your cursor’s insertion point and the menu should disappear.
-
5)Invoke the Action Menu and press 4 for dealloc etc... 9 for viewDidUnload etc...
Your output should look like this if you have ARC Aware turned ON.
At the top of the Action Menu, you will see the first menu item titled ARC Aware with a keyboard shortcut assigned to the character “z”. You can toggle ARC Aware by tapping the “z” key on your keyboard. The menu will not disappear, rather, it will stay available to you so that you can generate the code you need.
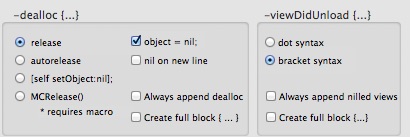
The InDepth help pages describe how you can have -dealloc and -viewDidUnload to always be generated and append whenever you generate your “Implementation” action. It’s a simple matter of settings in the Accessor Style TAB in Accessorizer’s main interface.

-
1)Move cursor to position in Xcode
-
2)shift-ctrl-cmd-0 (shift control command zero)
-
3)Select action
Detailed walk-thru: